The Genesis Responsive Slider has been added to a Genesis Child Theme!
This post about the Genesis Responsive Slider was originally published on April 22, 2012. The response has been so great that we have decided to update it a little bit and send it out again. Please check the comment area too. There has been a lot of good discussion about the Genesis Responsive Slider there too.
I know, you think that with all the sliders available why would you need a new one? But this one, called Responsive Slider, is included with a Genesis Child Theme. StudioPress Themes are well known for their Genesis framework and the fantastic child themes to use with them. I’ve found Genesis to have nice clean code that is SEO friendly. Their themes are easy to use and produce a user friendly and visually pleasing website.
This new Genesis Responsive Slider is used in several Genesis themes. Since it is relatively new it seems as though they are still working through some issues with the slider.
Update: Even though the Genesis Responsive Slider is not so new anymore the documentation is still lacking. Their forum is loaded with questions about this Responsive Slider. T
There are some tricks you need to use to make this Genesis Responsive Slider work correctly. Let’s try to make things a little more clear here.
Here is what I did to create an awesome Responsive Slider
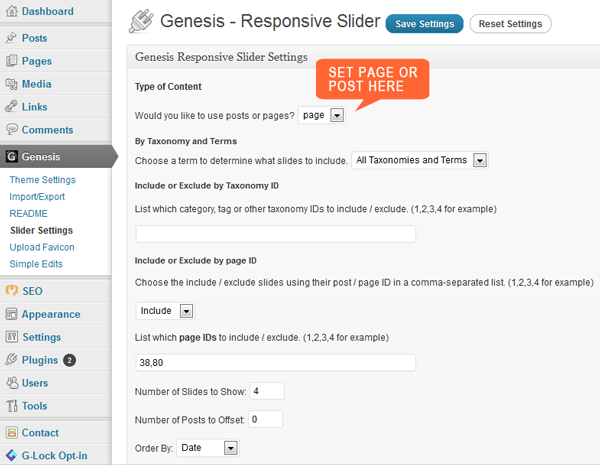
The Genesis Responsive Slider can pull its images and content from either pages or posts. This is set in the Responsive Slider settings – found in your WordPress CMS settings under the Genesis tab. My example shows using pages. You can see that I have chosen to use the “include” option and have entered my page IDs.
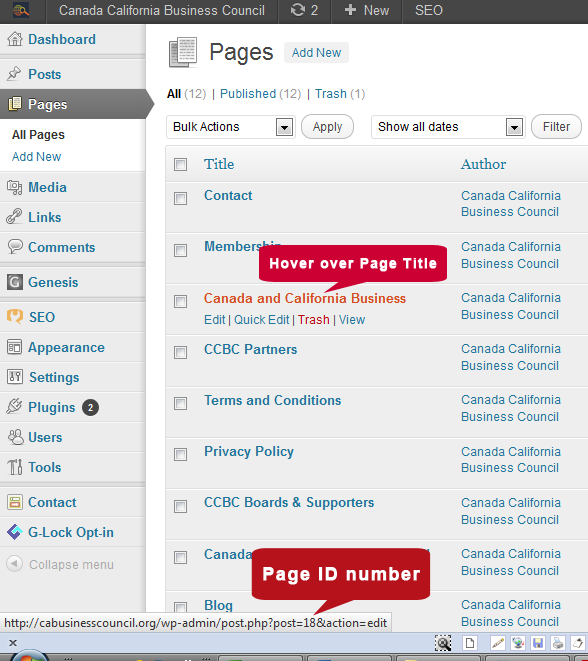
If you are wondering where you get the Page ID it is rather simple but not often known by some new WordPress CMS users. Go to your Pages tab and click on All Pages. When you see the desired page that you want just hover your mouse over the page title and you will see on the left bottom side of your window a URL of the page. It will include in the string something like “post=18&action=edit”. Whatever that number is (this one is 18) determines your page ID. Simply take that page ID and insert it in your “include” option. Do the opposite if you are excluding. This same process works for both posts and pages.
Create a new page (or post depending on what you are using for your Responsive Slider) in your WordPress CMS
- In your WordPress CMS go to the Page tab—Add new.
- Enter all the content that you would like included in the page.
- Upload the image you would like to use as a “featured image.” The slider pulls from the first image inserted in your page. If you put an image in the content it will pull that one. This is not advised because you need a certain image size for your slider to work correctly.
Image size: 950px X 300px. This image will be partially hidden by the part of your slider that has the description in it (this is pulled from your page content). If you don’t mind part of your image being hidden behind this it will be fine. Update: With wider screen widths being used more frequently now you may want to adjust your image size to fit a wider width. - If you would like your whole image to show up then you will need to do a little fine tuning in Photoshop or a similar program.
- Create a new image file with the width 950px and the height 350px. Background contents: transparent. If you do not have Photoshop a program like Gimp should do the trick.
- PLEASE NOTE My Slider Excerpt Width (in percentage): 26. Have your slider image ready to go. This image size should be 630px X 300px (this depends on your slider excerpt width). Place your desired image and move it all the way to the right side (the slide description will be shown on the left side).
- Save for web and devices as a .png file.
- Upload this image file to your page Featured Image.
Content for your slider description is pulled from your page content and here is another place where Genesis should have done a little more work before they launched the Responsive Slider.
Slider pages must use the “more tag”. Place the more tag after about 103 characters. It is best if this is a line by itself at the top of your page content because you will need a space after it so the Read More button places correctly. (Note: I have entered a line height in the CSS — input[type="button"] line-height:34px;. That helps with the placement of the Read More button but it puts it right after the last word–not in a separate line.
With these instructions, you will want to make adjustments for your particular Genesis Responsive Slider size and images.
Have any questions or more information to add? Let us know in the comment section below.


This plugin allows you to create a simple responsive slider that displays the featured image, along with the title and excerpt from each post.
Hi Eliz,
Thanks for your post. I did work on it, just as you said but my slider looks awful. Somehow even if I change the size settings it looks so out of place. There’s numerous boxes. I was wondering..have you used other sliders that are better?
Thanks!
camille
Hi Camille, sorry you’re having trouble with the slider. It is a pesky little thing sometimes. I wonder if you would be better off using the responsive slider with no text next to the image – that is just an image that is for example 950×300? I used the responsive slider like that on another one of our websites. Web designers Las Vegas
I’m assuming you are using a Genesis child theme. I’ve used a couple other sliders with Genesis child themes. But some of the themes are set up for using just one type slider. You can change but will take some coding. You might check out the Genesis Slider and see if that will work with the theme you are using.
Thank you so much for commenting. Let me know if you have any more questions. I’ll be glad to try and help.
Iam using a featured image from my maing page. Set it up the first time without fail. Using the silder to display one image (logo). Well I have just added a new page and now can not for the life of me figure out how to get the image to appear in the slider again. It just wants to pull from the newly added page. I have tried editing the dates on pages, etc. but nothing seems to work. Also I am using the “EDUCATION” theme
Hi Eliz,
I just started playing around with the Genesis framework and slider and I’m loving it so far! So clean, visually appealing and easy to use. Good tip on how to use pages with the slider…I couldn’t quite figure that out before. Thank you!
On another note, have you noticed that with any child themes that there is a 1 pixel white border between the menu bar and the slider (using the executive child theme)? It even wraps around 1 pixel down too. I’m a CSS noobie but I can’t seem to find where that white space is coded in the stylesheet.
Thanks, this was useful. I did most of this but how do you get the button to show up to say read more? Do I need to add some code somewhere for the button?
THANK YOU!!!! You provided clear instructions with an easy solution to something that was getting me a bit frustrated. Yay!
I’m so glad we could help you with the Genesis Responsive Slider. We first wrote this out of frustration so it is always great to be able to help someone make the process a little more simple.
I actually figured the 1 pixel thing out 🙂
It’s the box shadow:
#inner {
-moz-box-shadow: 0 0 0 1px #fff;
-webkit-box-shadow: 0 0 0 1px #fff;
background-color: #fff;
box-shadow: 0 0 0 1px #fff;
clear: both;
margin: 0 auto;
overflow: hidden;
}
Great David. Thank you for posting how you fixed the 1 px border. It is so much better than just saying you got it fixed. This should be able to help others too. Much appreciated.
Firebug can be a big help with fixing CSS and site issues.
I’m sorry I didn’t see your comment earlier or I would have replied sooner. Way to go in getting it figured out so your Responsive Slider is just how you want it.
Thanks!
I hope you resolved this. I just saw your comment. If you are still having problems with the slider feel free to email me at slider(at)rankingedge dot com.